
7 Creative Ideas for Using Our Brand-New Stencils
Hello, my lovely crafters! Get ready for an explosion of creativity! I’m Priss (@atful.layers) and today we’re diving into a new blog post to show you seven cool ideas for getting the most out of our brand-new stencils. These super versatile tools are the perfect addition to your craft arsenal and offer endless possibilities to enhance your mixed media projects. Do you join me?
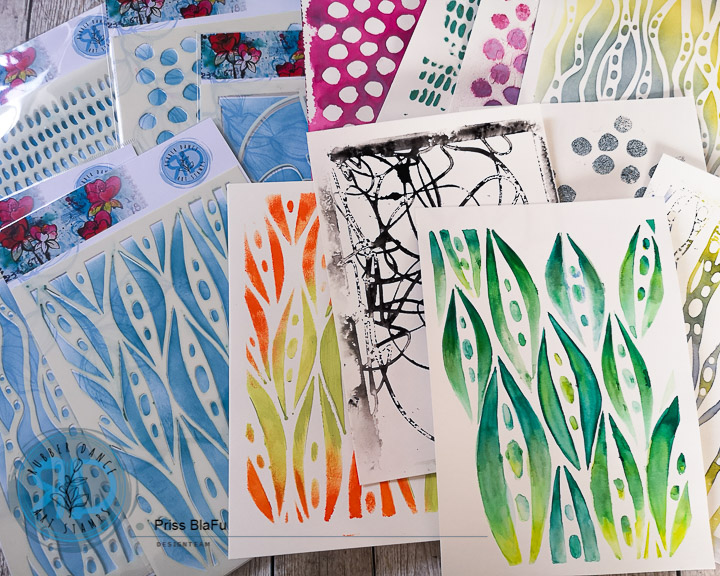
This post embarks on our exploration of creativity as we practice various ways to use these great stencils. Together, we’ll unleash our artistic potential by working with half-page-sized pieces of mixed-media paper and experimenting with a variety of seven fun mediums, ranging from magical embossing powders to luscious texture pastes.
So, grab your favorite stencils and your imagination, and let’s go on a journey of artistic exploration. Get ready to be inspired as we reveal seven ideas to spark your creativity and take your projects in new directions. The important thing is that you practice the techniques with your own favorite materials and colors, to discover what you like best and what you feel most attracted to.
At the end of this post you will find a video showing this techniques.
1. Stenciling with Embossing Powder

To begin, select a stencil that has some repeating pattern. In my case, I chose Ink Dots. Secure it firmly on the paper. Apply an embossing ink or adhesive through the stencil, ensuring full coverage within the desired areas.
Now, the magic happens. Remove the stencil first, then sprinkle a generous amount of embossing powder over the inked design, making sure to completely cover all exposed areas. Gently tap off any excess powder, allowing it to return to its container.
With your heat tool in hand, apply gentle heat to the embossing powder. Witness the mesmerizing transformation as the powder melts, revealing a raised, glossy texture that adds an elegant touch to your artwork. Move the heat tool in a sweeping motion, ensuring even heat distribution and preventing any scorching.
Embossing powder stenciling opens the door to a world of artistic possibilities, allowing you to create stunning backgrounds, striking focal points, or intricate embellishments. Experiment with different types of embossing powders, whether opaque, translucent, or chunky.
2. Stenciling with Acrylic Paint

To begin, select a stencil that speaks to your artistic vision. In my case, I chose Leaves 1 because I love nature. Secure it firmly on the paper.
Choose two acrylic paints that match. For example two complementary colors in different shades or two shades of the same color. And apply them with a sponge, making sure to get some of the paint off the sponge before applying it to the paper through the stencil.
Don’t be in a hurry, enjoy the moment of applying the different paints and allow them to blend in some areas. This fun technique adds depth and dimension to your background, creating stunning details and blends that demand attention.
3. Stenciling with Ink Pads

To begin, select your favorite stencil. In my case, I chose Organic 1, my favorite stencil of all. Secure it firmly to the paper with the help of one or two clips.
Choose two or three matching ink pads. I love the Distress Inks because of the variety of colors, but you can use whatever is your favorite. I apply them with a makeup brush because it facilitates their application so that there are no harsh marks, but you can do it with any type of sponge that you like.
The best thing about applying this type of ink that dissolves with water is that we can get two backgrounds for one since there is always a remnant of ink left on the stencil. We can activate this remnant with a spray of water and use it as a stamp to obtain the negative of the stencil.
4. Stenciling with Sprays

To begin, select a stencil with big areas. In my case, I chose again Ink Dots. Secure it firmly to the paper.
Choose at least two pigment sprays. I chose two different shades of violets that are opaque (one lighter than the other) and a third spray of translucent pigments with mica, this way we can also add different textures as well as color.
The way to apply them is very simple. First, we shake the liquids well from side to side, to avoid clogging the mechanism and when they are ready we spray making a smooth movement sliding the can from left to right while we squeeze the spray. In this way, we avoid those unwanted circles.
Again we can use the remnant pigment to get two backgrounds. We can activate this remnant with a spray of water and use it as a stamp to obtain the negative of the stencil.
5. Stenciling with Texture Paste

To get started, select a template with small or large areas. In my case, I chose Marks 1. Secure it firmly to the paper with a clip or two.
Use a mixing palette to place some of the texture paste, ensuring it’s of a smooth consistency and ready for artistic exploration. The paste I chose has a very nice texture when it dries. Use some type of pigment to color the paste. Be sure to mix the paste with the pigment very well so that it’s even.
Now, it’s time to infuse your texture paste with vibrant pigments. Take a small amount of texture paste and mix it with your favorite pigments. Blend the pigments into the paste until you achieve the desired hue and intensity.
Using a spatula, apply the colored texture paste over the stencil, making sure to spread it evenly and cover the desired areas. Embrace the freedom to experiment with different application techniques, from gentle sweeping motions to bold, intentional strokes.
This technique adds a whole new dimension of texture and color to your projects, allowing you to create attractive mixed media pieces that truly stand out.
6. Stenciling with Watercolor Markers

To begin, choose a stencil that sparks your creativity and place it securely on your paper. In my case, I chose Leaves 1.
Using a light touch, lightly trace the outline of the stencil design with your watercolor markers. Allow the colors to blend in internal areas of the design, creating a beautiful gradient of shades as you go. Feel free to experiment with different color combinations, layering hues to achieve the desired effect.
Once you’ve filled in the design, it’s time to add depth and dimension. Take a wet brush or water brush and gently blend the colors together, allowing them to spread and merge organically.
This technique creates a delightful watercolor effect, infusing your artwork with a soft, ethereal quality. The translucent nature of watercolor markers lends a delicate and luminous touch to your stenciled design, adding a sense of movement and whimsy.
7. Stamping with Stencils & Acrylic Paint

To get started, select a template that aligns with your artistic vision. This time place the stencil with the side you like facing up on a surface you don’t mind staining. I chose Scribbles 1 because I think it’s perfect for this technique.
Now is the time to unleash your artistic style. Load a brayer, a brush, or a sponge with your chosen acrylic paint (I love black for this stencil), ensuring even coverage. Lightly pass the paint over the stencil, applying it smoothly.
Spray with a little water so the paint doesn’t dry out and stays wet on the stencil. Flip it over and place it on the paper as if it were a stamp. Gently press on top with absorbent paper or use another piece of paper.
Remember, embrace the spontaneity and experimentation that mixed media art offers. Explore various color combinations, stencil designs, and medium effects to unlock your own unique artistic style. Let your imagination soar and watch as stenciling adds a touch of enchantment to your mixed media projects.
Hope you enjoyed this fun tutorial. Please stay tuned for the upcoming post and be prepared to be inspired by the magic of our brand-new stencils. See you soon in our creative sanctuary!
Hugs, Priss
(My Posts | Instagram | Facebook)
The stencils I used


Subscribe to our Newsletter


I’m so glad to hear that you enjoyed the tutorial, Marianne! Thank you!. Of course, the stencils are a must-have for this craft. Keep an eye out for upcoming releases and keep crafting!
So Much! Inspiration, lovely and so beautiful. Thank you for the tutorial (the stencils are on my list to purchase soon and can’t wait to try some of your techniques)